Do you often find yourself getting back from a ride with a nagging problem or pain? Maybe a finger is numb, or your back is sore, a stiff neck even? Nine times out of ten if you’re feeling discomfort or pain from cycling then you need to look at how your bike is set up. The frame size, saddle height, and cleat positioning all play a contributing factor to how comfortable you are while riding your bike.
If you’re sat there scratching your head and wondering how on earth you can figure this out to the nth degree, you’re not alone, but don’t worry you’re not looking for centimetre perfect. A professional bike fit is expensive for a reason, it takes a knowing eye and a ton of measurements to get you properly aligned and fitted on your bike. However, there are changes you can do at home to get yourself as comfortable as possible while riding, which in turn, will make that daily exercise on the bike that little bit more enjoyable.
Frame Size

This is for people yet to buy a bike or looking for a new bike. It’s important to do your research when buying a new bike, remember, no changing of saddle height or cleat positioning will fix a frame that’s fundamentally too big or small for you. The geometry and frame size will differ for different brands so try and find a sizing guide online or ring the shop and ask for help. Any bike shop worth its salt will help you find the right bike size for you.
Saddle Height
Getting the saddle height correct on your bike can be the difference between making it and breaking it on a ride. What you may not know is that niggle of pain you are experiencing can lead to more serious injuries, overreaching and rocking your hips while cycling is a sign that your saddle is the incorrect height. I’m sure on many occasions you’ve stopped on the side of the road to make minor adjustments to your saddle, just to get back on and huff in irritation as it still doesn’t feel ‘right’. So, let’s look at the steps we can take to get our saddles as close to perfect as we can.

If you’re more of a hands-on learner then position the crank arms so that they’re parallel to the seat tube (or half-past 12 on the face of a clock). Sit on the seat and put your heel on the pedal. If you can’t reach the pedal, lower the seat until you can; if your leg is bent at the knee, raise the seat just until it’s straight.
For those who prefer a more mathematical approach to set your saddle height (and have cleats) then stand barefoot on a hard floor, back to a wall, with a book snugged up between your legs, spine facing away. Measure from the floor to the top of the book spine. Multiply that number by 0.883 and subtract 4mm (1/8th inch). The result is your seat height, measured from the centre of the bottom bracket to the top of the seat, along the seat tube.
If you’re out and about and need a quick fix then a rule of thumb is lean over your bike with the saddle tucked into your armpit, stretch your arm down and you should be able to reach the crank bolt with your finger, this should get you there or about.
Cleat Positioning
Your cleats and pedals are key contact points between your body and bike and if positioned incorrectly can cause a world of problems including performance issues and injuries. So, here’s a 6-step process you can do at home to make sure your cleats are positioned to make your ride as comfortable as possible. Make sure you do both feet as they may position differently.
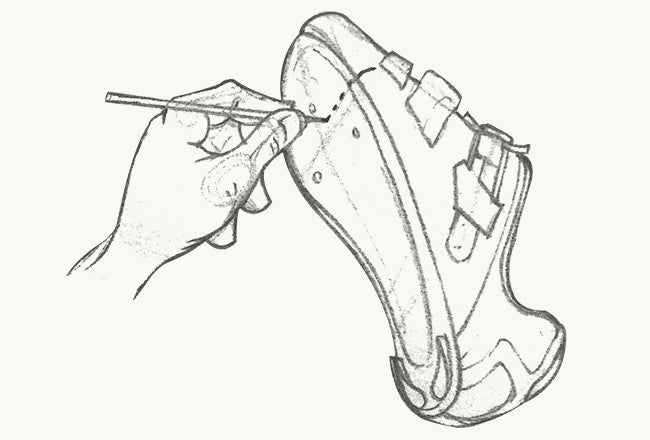
- With your cycling shoes on and tightened, you want to find the ball of your foot on both the inside and outside of the shoe. When located mark them with a pen, you might want to put masking tape on your shoes first to stop them from getting ruined.
- Now take your shoes off and flip them upside down and draw a line between the two marks and locate the centre and make a mark. The shoes have markings on the bottom so this should help you find the middle.
- Take your cleat and locate the centre, most cleats will have an indication where the centre of the cleat, this is the point that sits directly over the pedal axle.
- Grease up the bolts before fitting. It will protect the thread from all the water and road debris.
- Fit cleat, loosely, aligning your mark with the point on the cleat where the centre of the pedal axle will be, once you are clipped in. Most cleats provide a marker on the side, by way of a notch or line to indicate the centre of the pedal axle, so it is just a case of lining up your mark with theirs.
- Move the cleat side-to-side to influence how close the foot sits to the centre-line of the bike. If you ride with your knees wide at the top of the pedal stroke, move your cleats inwards to move the foot outwards. If you ride with knees narrow at the top of the stroke, move the cleats towards the outside of the shoe and the foot inwards.

When you’ve completed all steps make sure they’re adequately tightened and then head out on your bike to make sure that everything feels comfortable. If they’re set up differently from before it may feel a bit unusual to start but you’ll notice an improvement to your pedalling after not so long. If they feel uncomfortable you may want to take them off and try again.
After any changes to your bike, no matter how small, be sure to go round the block once or twice on to make sure it feels comfortable and make any necessary tweaks.

